Read the previous article
Test area: Test
Skip to main content
Skip to menu
Skip to footer


 CAUTION! Perform the test with no current flowing
Ekip Connect
Everything in view, all under control
Select your language
Select your language
Test area: Test sequence
Description
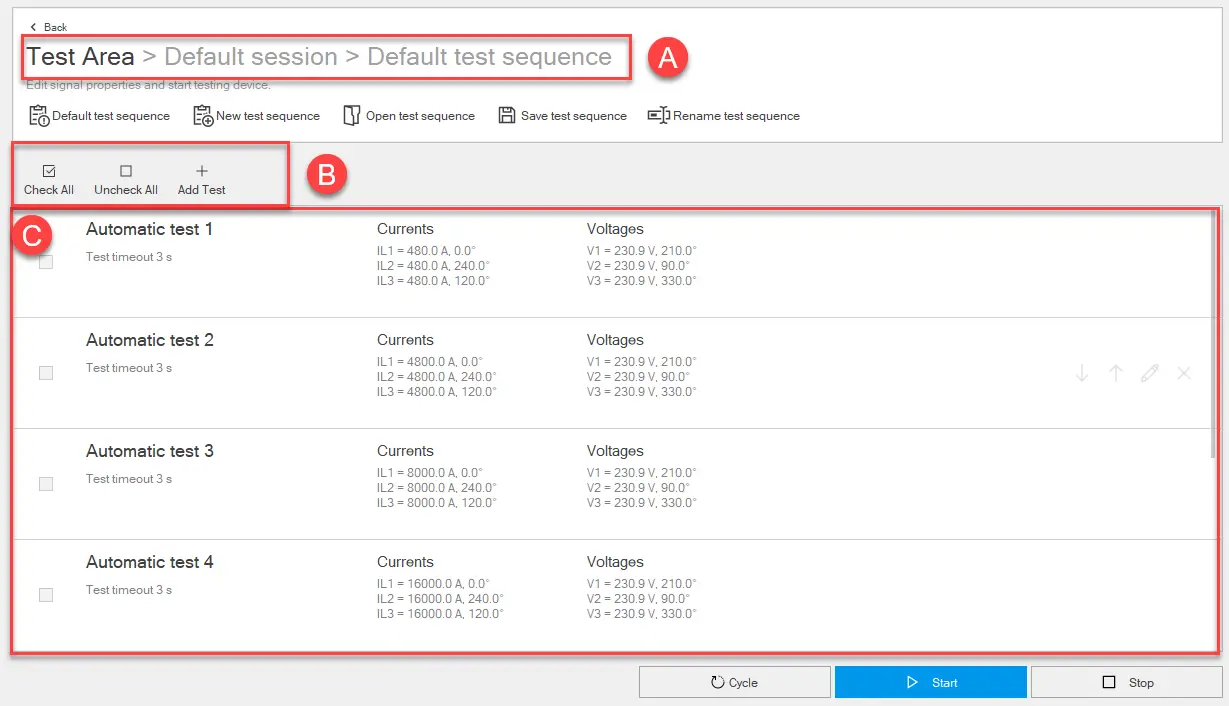
Tests can be run in series in the form of a test sequence. ABB provides a sequence of predefined tests that covers the widest possible range of abnormal current and voltage values. Customized test sequences can be created.
What it looks like

Part | Function |
|---|---|
| Back | Returns to the main page of the Test area function. |
| Default test sequence | Opens the default test sequence in the page. |
| New test sequence | Opens and displays a new sequence test. Test sequences are empty by default |
| Open test sequence | Opens a test sequence in .tsq format previously downloaded and saved on the PC. |
| Save test sequence | Saves the test sequence on the PC in .tsq format. Note: the .tsq format is a proprietary format that can only be read with Ekip Connect |
| Rename test sequence | Renames the open test sequence. |
| A | Indicates the session and title of the open test sequence |
| B | Buttons to manage the tests in the sequence.
|
| C | List of tests in the sequence. The following information is provided for each test:
|
| Cycle | Repeats the test sequence until it is manually interrupted. |
| Start | Start the test sequence. |
| Stop | Interrupt the test sequence. |
Test editing tabs
| Tab | Content |
|---|---|
| Property |
|
| Signals | See Tab Signals |
| Harmonics | See Tab Harmonics |
Start a test sequence
 CAUTION! Perform the test with no current flowing
- With the device connected and communicating with Ekip Connect, click on Tools > Test area.
- If required, create or select the session in which to perform the test (Create a test session).
- Proceed as follows:
| To perform... | Then... |
|---|---|
| the default test sequence | click on Default test sequence |
| a previously saved sequence | click on Open test sequence and select the .tsq file of the sequence to be opened |
| a new sequence | see Create a test sequence. |
- To customise the current and voltage settings and values of a test, place the cursor on the relevant test row: the test action buttons appear.
- Click on
, customise the settings according to the device configuration and the conditions you want to test.
- Click on OK.
- Select the tests you want to run in the sequence.
- To start the sequence, click on Start: the signals are sent to the protection release. The line corresponding to the running test shows the progressive test status and, when the test is finished, the test result. At the end of a test, the next selected test in the sequence is automatically executed. At the end of the last test, the test sequence is terminated automatically.
Note: none of the parameters can be edited during the test.
The release may generate a trip, depending on how it has been configured.
- To interrupt the test manually, click on Stop.
- From the sequence completion window, click on Yes to generate the test sequence report. Otherwise, select No. It will also be possible to view the report later from the main test page (What it looks like).
Create a test sequence.
- In Tools > Test area click on New test sequence.
- Click on Rename test sequence and assign a name to the sequence.
- Click on Add test: the test 1 row appears.
- To customise test settings and the current and voltage values of a test, place the cursor on relevant test row: the test action buttons appear.
- Click on
, customise the settings in the test edit tabs according to the device configuration and the conditions you want to test, and click on OK.
- Repeat steps 3, 4, 5 for all the tests to be added to the sequence.
- To save the sequence, click on Save test sequence.
 : moves the test down in the order of execution
 : moves the test up in the order of execution
 : deletes a test