The function Datalogger allows the recording of data associated with a trigger event. The data recorded are:
analog measurements, i.e. phase currents and line-to-line voltages
digital events, i.e. protection events or alarms, circuit-breaker status signals, protection trips.
IMPORTANT: the function Datalogger requires an auxiliary voltage supply.
Operating principle
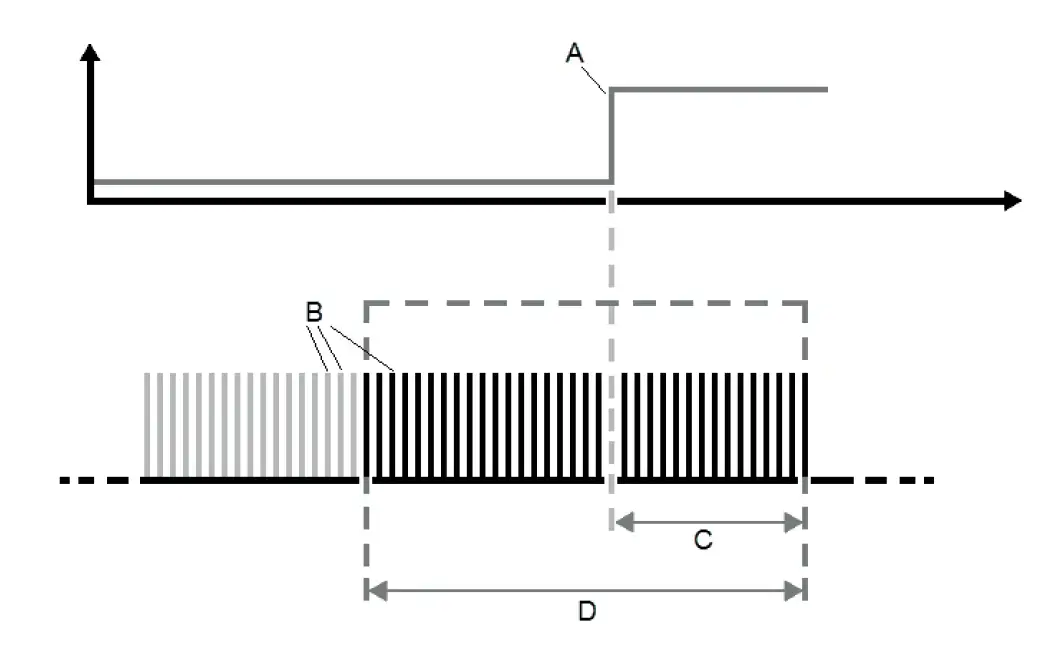
When Data Logger is enabled and activated, the device continuously acquires data by filling and emptying an internal buffer (B).
If the trigger event is encountered (A), the device interrupts the acquisition immediately or after a user-definable time called the stop delay (C). Next, it saves all the data in the window (D), which can then be downloaded to a PC for reading and analysis.
A subsequent recording overwrites the previous one in the device memory.
Datalogger in Ekip Connect
From Ekip Connect the following actions can be performed:
enable/disable the function
Start/Stop recording
configure recording parameters
download the recording to analyze it with function Data Viewer
>> For more details on supported devices and requirements for each, please refer to document 9AKK108467A9238 available here.
What it looks like
Part
Description
A
Button to go back to the menu Tools
B
Tool layout where Datalogger operations may be executed.
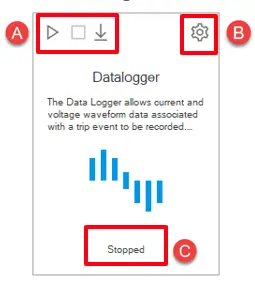
Datalogger layout tooltip
Part
Description
A
Tooltip button area
Start: Button to start datalogger recording
Stop: Button to finalize the running datalogger recording.
Download: Button to download the recorded datalogger. This button is only enable if datalogger is stopped.
B
Download Options: Options button to enable datalogger and set parameters about the recording (number of register, sampling frequency, stop delay).
C
Dynamic label to inform user about the status of datalogger. The available status are ready, running and stopped.
Settings Data Logger
Configuration is mainly done in the "Options" window which is reached via "Download options" button from tooltip.
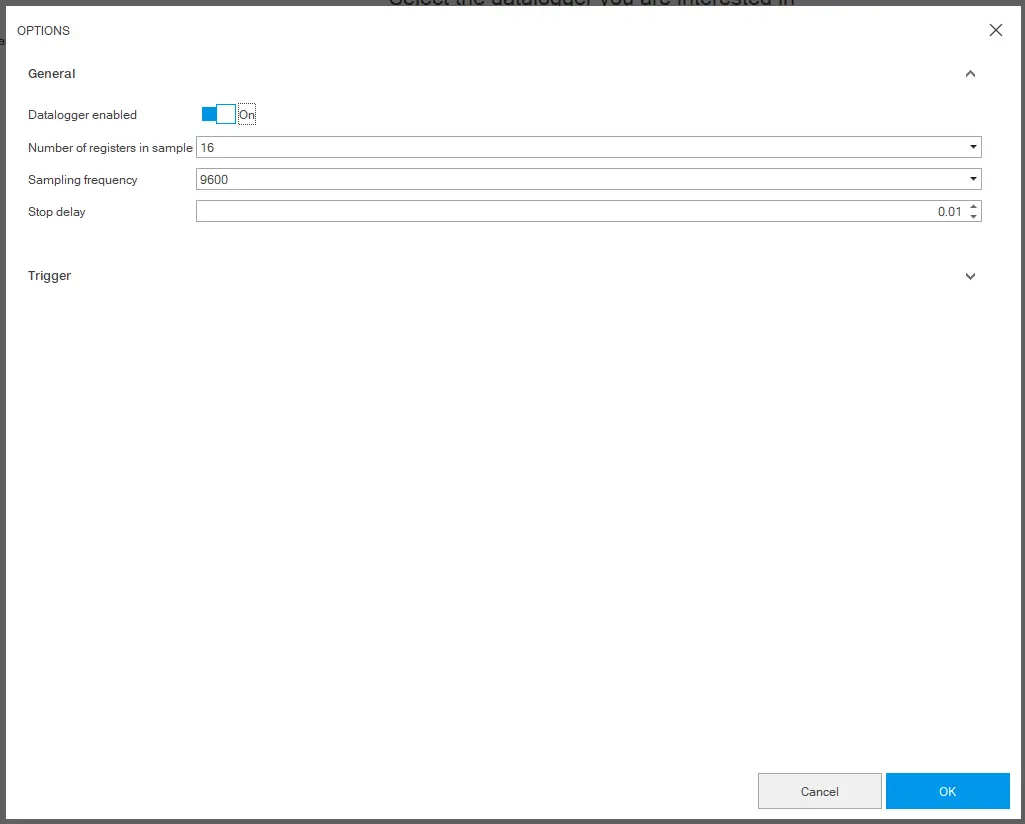
Options window mainly consisted of 2 parts ; "General" and "Trigger" sections.
In section "General", enabling of function and usual configuration for the datalogger is managed. User decides the number of the register in sample, sampling frequency and stop delay for that datalogger record.
Element
Description
Datalogger enabled
A button to enable/disable datalogger functionality
Number of register in sample
Number of register in sample (8, 16, 32)
Sampling frequency
Frequency of data collection. The higher the sampling frequency, the shorter the recording duration. (1200, 2400, 4800, 9600)
Stop delay
A button to set stop delay. It refers the duration, in seconds, of the recording after the trigger event. Maximum limit is 10 sec and available.
In section Trigger, user selects the desired trigger from the list of trigger event.
Start recording
With the device connected and communicating with Ekip Connect, click on Tools > Data Logger.
Check that the status of the command to enable the function (Download options --> Enable) is Enabled .
Click on and configure recording in "General" section.
To cancel the changes, click on Cancel. To save the configuration, click on OK : the settings are automatically saved and transmitted to the device.
Click on Trigger and set the trigger type.
To cancel the changes, click on Cancel. To save the configuration, click on OK: the settings are automatically saved and transmitted to the device.
Click on Start Datalogger: Recording is initialized.
Click on Stop Datalogger: Recording is stopped and ready to download.
IMPORTANT: once started, the function remains active on the device regardless of the status of the connection and communication with Ekip Connect.
Download a recording
With the device connected and communicating, click on Download Datalogger .
Note: the Download button is available only if there is a recording.
Select where to save the file and the interval of the recording you want to download: Ekip Connect saves an .abb file named according to the following syntax: CBTagName_Datalogger_YYYYMMDDhh:mm:ss.
Note: if communication with the device is via a point-to-point connection, it can take up to 5-10 minutes to download the file. With a bus network connection, the operation is faster.
Download only the recording interval with useful data to reduce download times.
Please consult the table below which shows the relation of frequency and register in sample with recordable datalogger file size.
Sampling
Frequency (hz)
Number of
Register in Sample
Size of
Datalogger file (s)
1200
8
13.6
16
6.8
32
3.4
2400
8
6.8
16
3.4
32
1.7
4800
8
3.4
16
1.7
32
0.85
9600
8
1.7
16
0.85
32
0.425
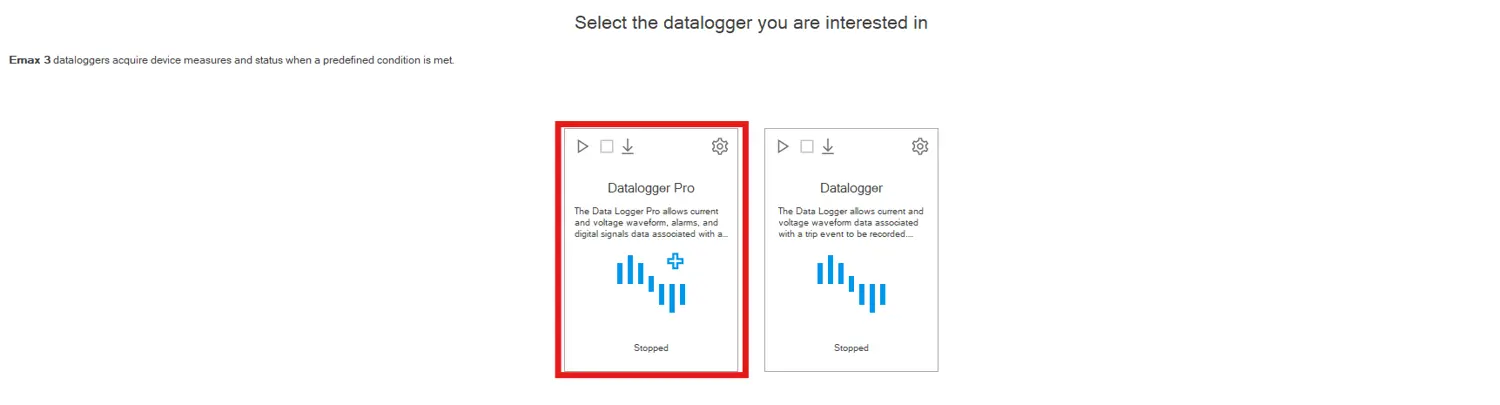
Datalogger Pro
The Data Logger Pro allows current and voltage waveform, alarms, and digital signals data associated with an event to be recorded. An SD card installed on the circuit breaker is necessary for this functionality, enabling longer recording durations. Additionally, the Pro version provides more variables compared to the basic version, offering a comprehensive overview of system events.
Prerequisite:
The tool is only available to operate if the "Datalogger Pro" Digital Upgrade is present and activated in the connected Sace Emax 3 breaker.
The tool is operable with Flash memory (SD card), which should satisfy the following specifications:
Standard SD cards* <= 2GB are not supported.
Extended or HIGH capacity SD cards* up to 512GB are supported.
*A warning is generated if SD card size <48GB
When all the prerequisites are satified, the Datalogger Pro section will appear. Click on the Options button to perform the configuration.
By accessing the "General" section, parameters such as the number of registers in sample, sampling frequency, stop delay and the enabling of datalogger can be set.
Element
Description
Datalogger enabled
Enable/disable datalogger functionality
Number of register in sample
Number of register in sample (8, 16, 32,64)
Sampling frequency
Frequency of data collection. The higher the sampling frequency, the shorter the recording duration. (1200, 2400, 4800, 9600)
Stop delay
Set the stop delay, which is available only if "Single trigger" modality is selected. It refers to the duration, in seconds, of the recording after the trigger event. Maximum limit is 10 seconds.
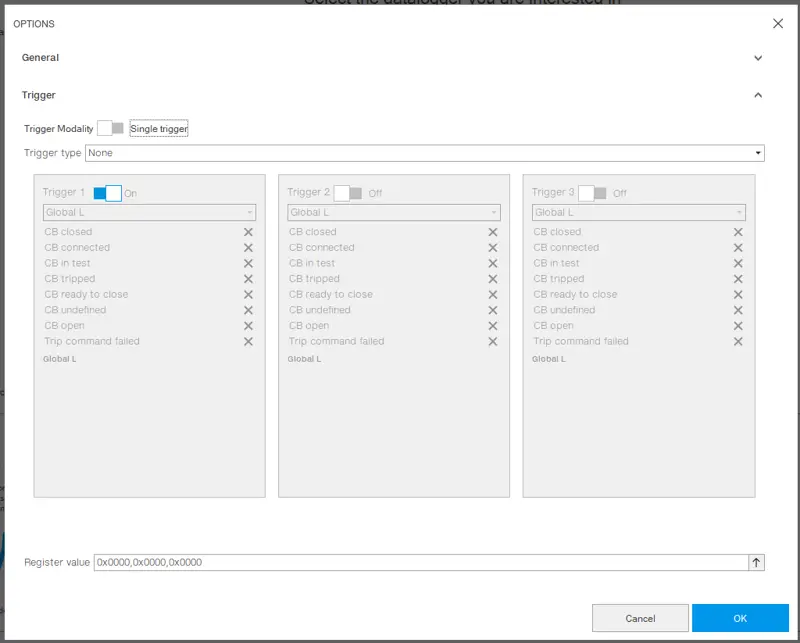
In the"Trigger" section there are two modalities available, "Single Trigger" or "Multi trigger". The latter one enables the possibility to set up to three different triggers.
Single Trigger
In Single trigger modality, you can set the Trigger type from the list of pre-defined trigger events or even a customized one according to your needs.
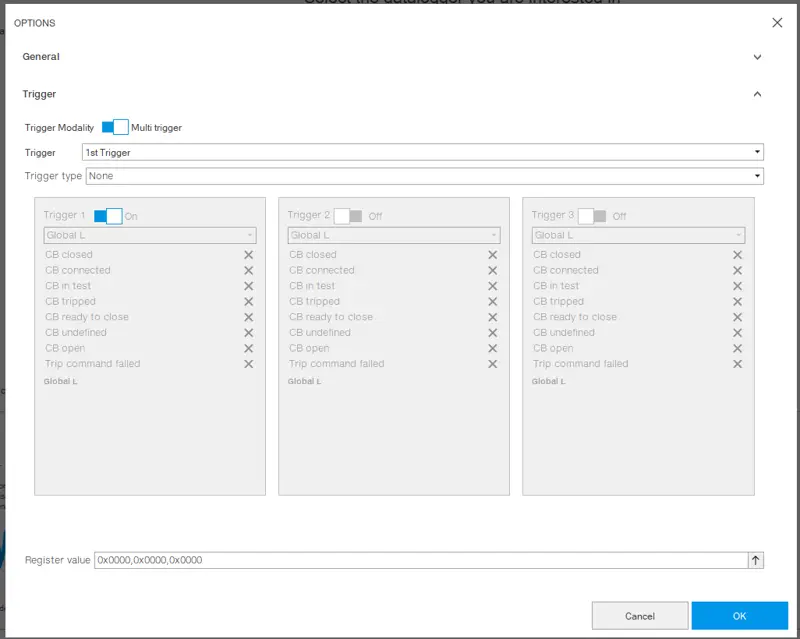
Multi Trigger
In Multi trigger modality, you can set trigger types independently for up to 3 triggers. A maximum of 30 total trigger events can be recorded during a single registration.
Part
Description
Trigger modality
Enable multi trigger modality.
Trigger
Select the trigger you wish to set.
Trigger type
Set the type from the list of the trigger events. There is an option to set a customized trigger event as desired by selecting custom trigger type.
Register value
Set the trigger event type by hex decimal number
Start recording
With the device connected and communicating with Ekip Connect, click on Classic View > Datalogger Advanced > SD cardInformations and make sure that the SD Card status is OK.
Afterwards, click on Tools > Data Logger Pro.
Click on the Download Options and configure the recording in the "General" section. Make sure that the Datalogger enabled is On.
To cancel the changes, click on Cancel. To save the configuration, click on Apply: the settings are automatically saved and transmitted to the device.
Click on Trigger and set the modality along with the trigger type.
To cancel the changes, click on Cancel. To save the configuration, click on Apply: the settings are automatically saved and transmitted to the device.
Click on Start Datalogger to initialize the recording.
Click on Stop Datalogger to stop the recording.
Download a recording
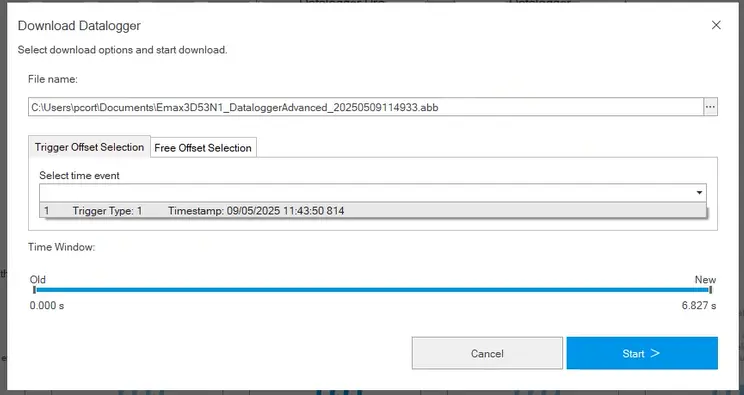
Click on Download Datalogger and you will be presented with a window containing dedicated sections to be filled and selected.
Filename
Choose the name of the datalogge file and the directory. By default file name is in CBTagName_Datalogger_YYYYMMDDhh:mm:ss format. File extension must always be ".abb" .
Trigger offset selection
Allows you to select the trigger event to be downloaded in case the Multi Trigger modality is chosen.
Free offset selection
Provides a cursor on the timeline with which you can choose at which timestamp to start the download operation. It allows the download window to be centered on an absolute time. Available when the Multi Trigger modality is chosen.
Time window
Time-based window for selecting the start and end of the Download. You can reduce or enlarge the window by scrolling the two cursors.
The Datalogger file can be downloaded in two distinctive ways:
Through Ekip Connect when the SD card is still mounted in the Ekip Aware trip unit
By unmounting the SD card from the breaker and connecting it directly to your PC. To perform this type of action, the circuit breaker should be in an opened state and the operation must be performed in full safety.
If you choose the second option, there would be no need to download the data on the Datalogger PRO, because you could open the recording directly in the Dataviewer tool by cliking on the "Open Card" button . The maximum DataLogger file size in seconds downloadable through Ekip Connect without unmounting the SD card is defined by a precise combination of the number of registers and frequency used:
Frequency
Register
Size (s)
1200
8
218.453
16
109.227
32
54.613
64
27.307
2400
8
109.227
16
54.613
32
27.307
64
13.653
4800
8
54.613
16
27.307
32
13.653
64
6.827
9600
8
27.307
16
13.653
32
6.827
64
3.413
If you wish to download Datalogger files that exceed these limits, you should unmount the SD Card and connect it directly to your computer. Afterwards, you can read its data by accessing the Dataviewer tool.


 Download only the recording interval with useful data to reduce download times.
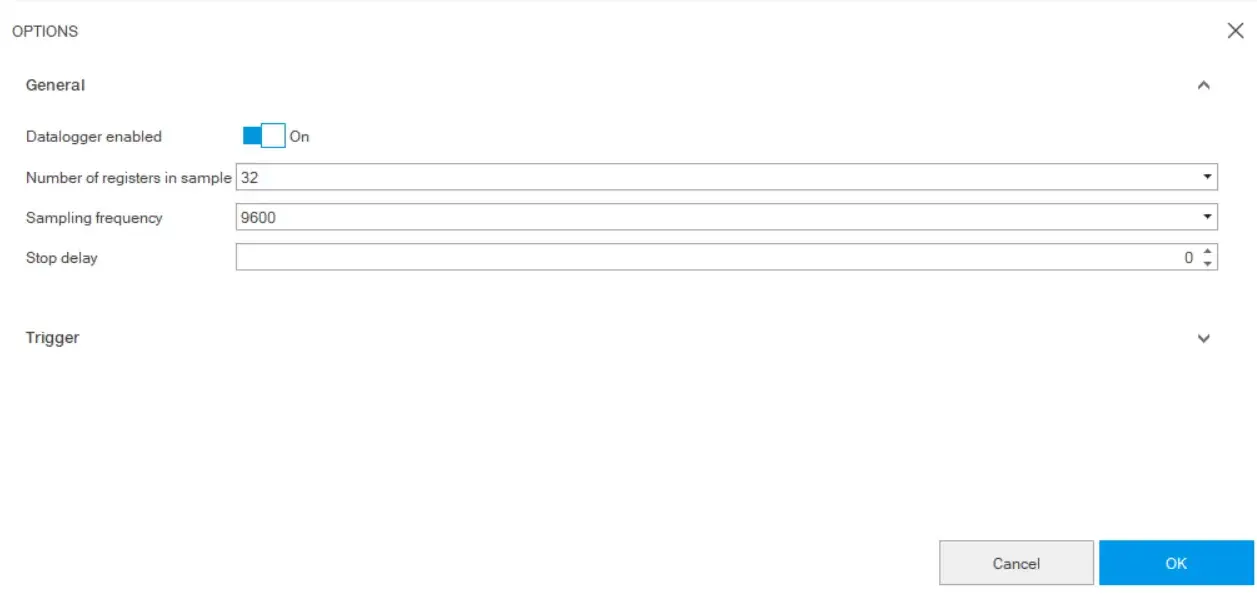
and configure recording in "General" section.
to initialize the recording.
to stop the recording.